In this tutorial you will learn how to design a classic red & gold emblem type of logo with Corel Draw. This in-depth logo design tutorial includes steps on designing a golden frame, logo body, red ribbon and golden accent. This logo can be used as a badge, emblem, insignia and will look good on a label, flag, stationary etc. This kind of logo works well for vintage, classic usage, as it has a elegant classic feel. You can also download the free source file for this awesome logo design template. 

Tutorial Details
- Program: CorelDraw 11 - X5
- Estimated Completion Time: 30 Minutes
Step 1 : Basic Elements
First of all you have to use CorelDraw with version 11+. In this tutorial I use CorelDraw X5.
Okay lets get started. Let’s take a look at the basic elements used to create our design :
Step 2 : Creating Worksheet
Okay, now that you know the steps and elements, we will begin.
First of all open your CorelDraw program. Now create a new file and set the paper size to A4.

Step 3 : Creating Golden Frame
Now that we have our worksheet set, now we will begin to create the Golden Frame, using "Ellipse Tool ".
Go to the "Ellipse Tool ", you can find it on the left toolbar, make a circle shape and then make the circle shape resized into 8 x 10 cm

Create a second circle inside the original circle using the " Ellipse Tool ".
Resize the second circle to 7,5 x 9,375 cm.
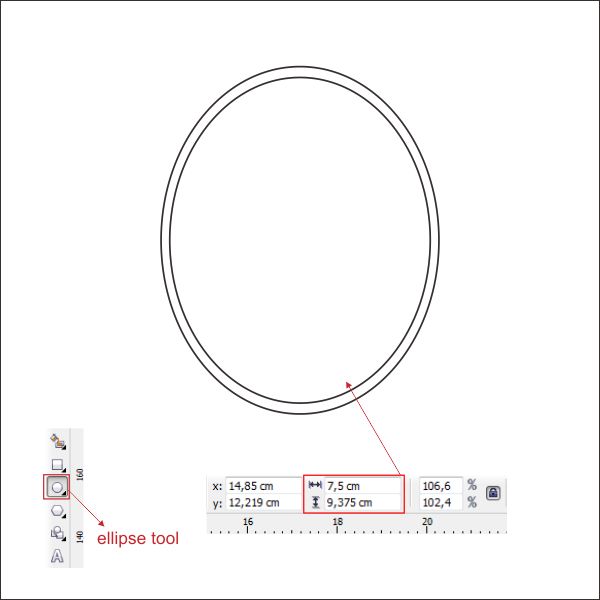
Create a third circle inside the original & second circle using " Ellipse Tool ".
Resize the third circle to 7,5 x 9,375 cm.

Tips :
To make multiple object automatically centered, select all the object and press " C + E ". this will make the multiple object centered Horizontal & Vertical.
Step 4 : Coloring the Golden Frame
Now let’s put color in the Golden Frame :
Select the first circle which is the biggest one. Go to the Right Toolbar, there you will find "Color Palette".
Right Click on the yellow palette in order to change the circle line color to yellow.

Now select the second circle. Go to the Fountain Fill Tool, which is in the left bottom toolbar.
Choose Custom fill on the color blend and make the type Linear.
Now you will see a color box. You can change the color by left-clicking it,
fill the color with Gold on the left, Pale Yellow in the middle and Gold on the right.
You can make a custom fill by double-clicking at the color box.
Fill the color with Light Yellow on the middle left, and another Light Yellow on the middle right.
Two custom colors in the middle will make the color gradient softer.
Make the Gradient Angle to 90, which will make the gradient horizontal.

If you doing it right it will look like picture below.

Now lets put color in the third circle, select it and go to the Fountain Fill Tool,
Choose Custom fill on the color blend and make the type Radial.
In the color box. change the color by left-clicking it,
fill the color with Darkest Red on the left, Dark Red in the middle and Red on the right.

If you doing it right it will look like this.

After that we are going to make the R font inside the red circle,
in this tutorial i use " English Vivace ", you can change it to whatever you like.
Go to the " Text Tool " its in the left toolbar, left click anywhere on the screen and type it.

Now lets put color in it, Go to the Fountain Fill Tool and set the value the same as the Golden Second Circle.


We are going to put a shadow on it,
go to the "Drop Shadow Tool" in the left toolbar, hold and drag down till it make a shadow.

Select it and put it on top of the Logo Body

Step 5 : Creating Red Ribbon
We are going to make the Red Ribbon with " Bezier Tool",
Go to the " Bezier Tool " its in the left toolbar, draw a shape by point & left click
to create a box shape like in the picture below.
Make sure that the last click is connected with the first click or else you cannot put color on the shape.

Okay now that we have the box look transparent, we are going to shape it by using "Shape Tool",
Go to the "Shape Tool" its in the left toolbar, then right click at the top lines box shape,
and find "convert to curves " in the top toolbar.

Now left click at the start and end of the lines and there will be two dotted arrow,
left click and drag them in order to shape the box.
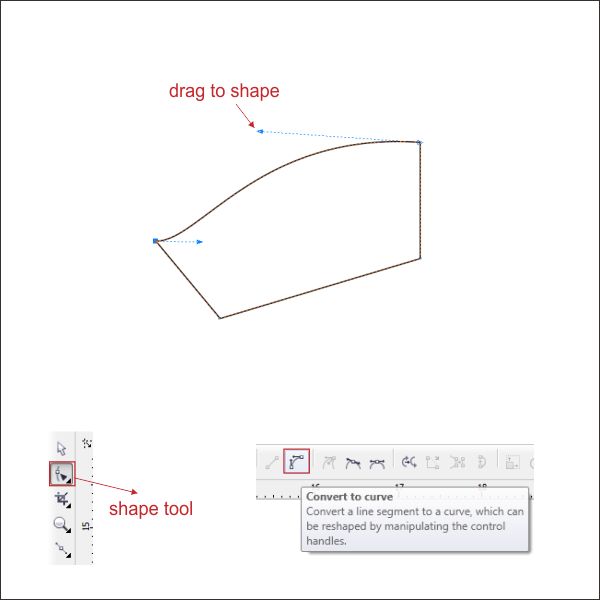
Apply it to the bottom lines, put red color and shape it like picture below.

Now draw a small box in the upper left corner of the shape by using " Bezier Tool ",
like in the picture below.

Using " Shape Tool " and steps like above, shape the small box similar to picture below.

Fill the small shape with red color, and put it behind by pressing " Ctrl + PageDown "

Now it look like a flag, we are going to add more flag shape on it,
Go to the "Bezier Tool" and draw another box next to the small shape.

Using " Shape Tool " and steps like above, shape the box similar to picture below.
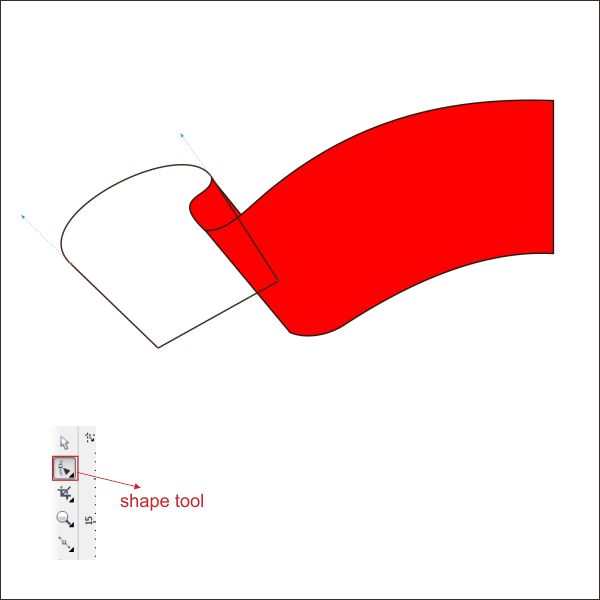
Put Red color in it, and send it to behind by pressing " Ctrl + PageDown "

Draw another box using " Bezier Tool ",
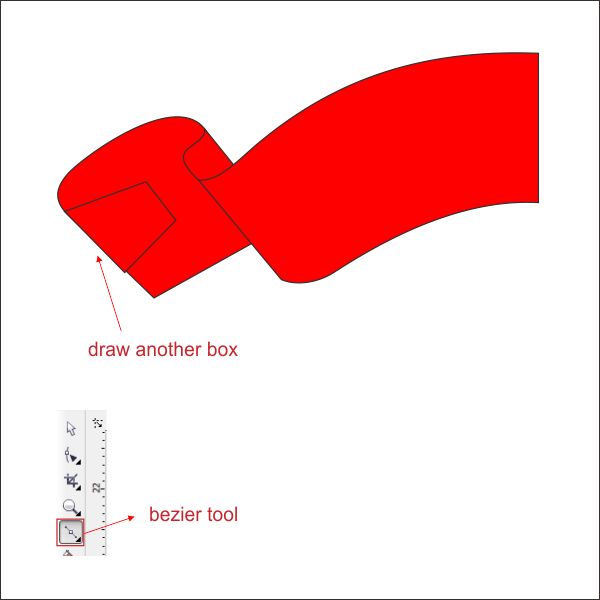
Shape it using " Shape Tool " like in picture below,

Draw another box with " Bezier Tool " next to the shape that you just create.

Shape it using " Shape Tool " like picture below.

Put Red color in the shape that you just created.
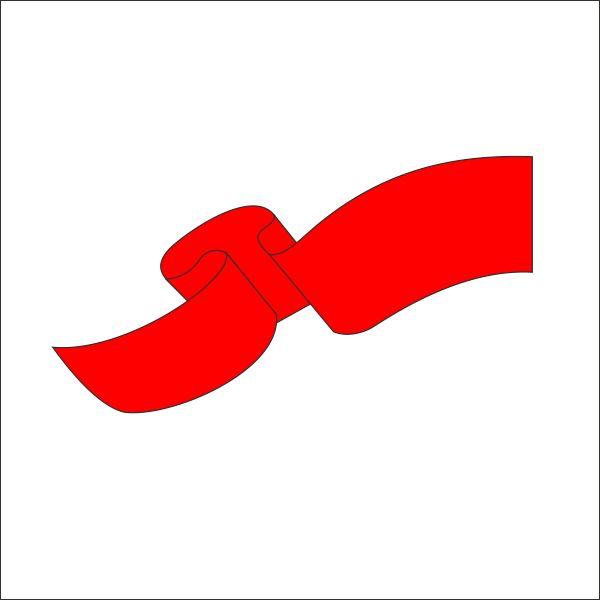
Now create the last Flag by making a box shape using " Bezier Tool "

Shape it using " Shape Tool " like picture below.

Put red color on it, and send it to back by pressing " Ctrl + PageDown "

Step 6 : Copy & Duplicate
We are going to copy & duplicate the ribbon so it will have both side right and left.Select all the ribbon, then while holding " Ctrl + Left + Right mouse " drag and flip it to the right side.
release the shortcut in order to copy it.

Now that the Red Ribbon already copied, we are going to weld the center Ribbon.
Select both of the center Ribbon, go to the upper right toolbar and you will see " Weld, Trim, Intersect " Tool.
Press the " Weld " button in order to weld the center Ribbon.

Step 7 : Coloring the Red Ribbon
We are going to put color in the Red Ribbon,
Start with the Center ribbon Select it and go to the Fountain Fill Tool, which is in the left bottom toolbar.
Choose Custom fill on the color blend and make the type Linear.
Now you will see a color box. You can change the color by left-clicking it,
fill the color with Dark Red on the left, Red in the middle and Dark Red on the right.

Now select all of the left side ribbon, go to the " Fountain Fill Tool " and apply value below.

After that select all of the right side ribbon, go to the " Fountain Fill Tool " and apply value below.

If you doing it right it will have color like this

Step 8 : Creating the Golden Accent
Now we are going to make the Golden Accent with " Bezier Tool ".
Go to the " Bezier Tool " in the left toolbar, draw a shape by point & left click and create a shape
similar like below.
Make sure that the last click is connected with the first click or else you cannot put color on the shape.

As now you know how to shape using " Shape Tool ", shape it using steps like in step 5,
like in picture below.

Now make a box shape on top of the shape that you just created with " Bezier Tool "

Shape it using " Shape Tool " and send it to back by pressing " Ctrl + PageDown "
.

Step 9 : Coloring the Golden Accent
Now that we have basic shape of the Golden Accent, lets put color in it.
Select the Big shape and go to the Fountain Fill Tool, which is in the left bottom toolbar.
Now you will see a color box. You can change the color by left-clicking it,
fill the color with Gold on the left, Pale Yellow in the middle and Gold on the right.
You can make a custom fill by double-clicking at the color box.
Fill the color with Light Yellow on the middle left, and another Light Yellow on the middle right.
Two custom colors in the middle will make the color gradient softer.
Make the Gradient Angle to 90, which will make the gradient horizontal.

Select the small Shape and put color on it by go to the Fountain Fill Tool, and set the value below.

If you doing it right it will look like this

Step 10 : Arranging the Golden Accent
Now that we have basic shape of the Golden Accent colored, we are going to arrange it.
Select the Golden Accent, copy, flip and resize it using the same way as step 6, similar to picture below.

After that draw a box shape using " Bezier Tool " in the right bottom corner of the Big Golden Accent.

Shape the box using " Shape Tool " as in picture below.

Now we are going to weld it with the Golden Accent,
Select the center Ribbon and the shape that we want to weld, go to the upper right toolbar
and you will see " Weld, Trim, Intersect " Tool.
Press the " Weld " button in order to weld the Golden Accent and the shape.
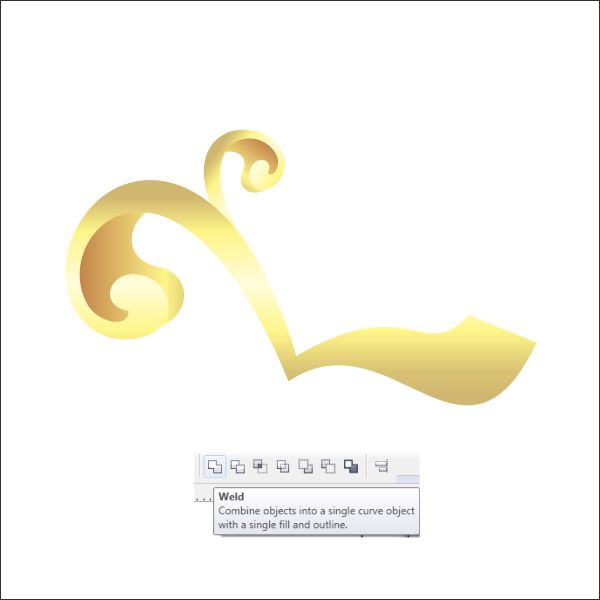
Select them all, copy and flip it by holding " Ctrl + Left + Right mouse " drag and flip it to the right side.
release the shortcut in order to copy it.

Okay now we are going to make the Center Golden Accent,
Select the little Golden Accent and copy it, we are going to use it to make a new shape.
Select the little Golden Accent again, copy, flip and resize it using the same ways as above.

Select them all, copy and flip it by holding " Ctrl + Left + Right mouse " drag and flip it to the right side.
release the shortcut in order to copy it.
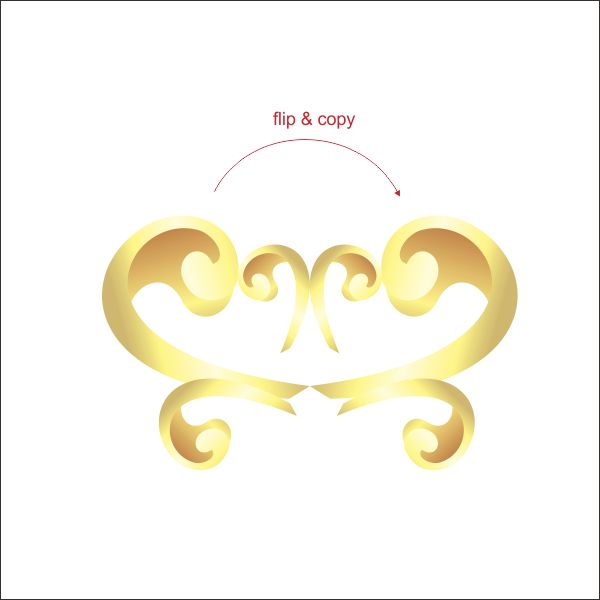
You have created a Logo Body & Frame in step 3 - 4, select and copy it.
We are going to use it in the center of the Golden Accent, but remove the R font.
After you select it arrange it on top of the Golden Accent.

Now Select them all, and arrange it on top of the first Golden Accent

Step 11 : Finishing
Okay now we have all the elements, lets put it together.
Select the Logo Body and put it on top of the Golden Accent

Send the Logo Body to back by pressing " Ctrl + PageDown "

Select the Red Ribbon and put it on top of the Golden Accent.

Now send the Red Ribbon to back by pressing " Ctrl+PageDown "

Copy and resize the Center Golden Accent, after that put it on top of the Logo Body

Final Image
And we are done, you can make it more exciting by adding more lines or background like the final image below


Tidak ada komentar:
Posting Komentar